Showing posts with label Project Photos. Show all posts

Friday, March 9, 2012

Ramelli Building & Remodeling - Deck - Southington, CT

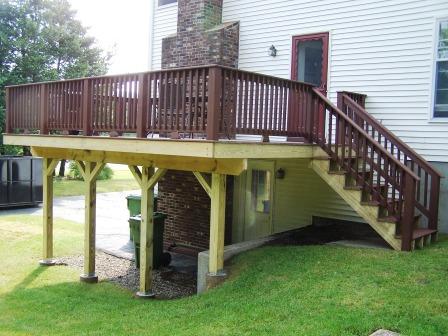
Ramelli Building & Remodeling, LLC was contracted by these homeowners to replace their outdated deck with something a little bigger and that would require a little less maintenence.  Trex in Madiera color was chosen for the decking and railings.

                       
Concrete footings in - galvanized post brackets bolted to concrete


Framing in progress


Close up of support post detail and lateral bracing


More shots of the framing


And finally the finished deck!!

Ready for company or a quiet evening enjoying the outdoors!!


Call 203 741 0005 to schedule a free estimate for your new deck!! Or visit http://www.ramelli1.com/ and fill out a customer information form.


Tuesday, June 14, 2011

Stamped Contrete Patio - Con't - Ramelli Building & Remodeling, LLC

Some shots of the stamped patio in progress and completed.  The pattern is 3x3 slate.


Call Ramelli Building & Remodeling, LLC @ 203 741 0005 or email us @ Rbr@snet.net for more information.


Sunday, May 15, 2011

Stamped Concrete Patio - Ramelli Building & Remodeling, LLC

One of our current projects is building a stamped concrete patio.  We are going to using a Chiseld Slate stamp in 48" x 48" sections.


First , we remove the decks from the house and sketch out the shape of the patio.


Once the basic layout is done we then remove the grass and drag any usable fill to areas that need it.


Then we compact the soil so that we can add the crushed stone that acts as the base for the concrete patio.

To be continued...

If you would like an estimate on building a stamped concrete patio, please call Ramelli Building & Remodeling, LLC @ 203 741 0005 or visit http://www.ramelli1.com/

Thursday, December 2, 2010

Ramelli Building & Remodeling - Wall Removal - Wallingford, CT

Here is a small job with huge effect and dividends.

Homeowners use a pellet stove in a room that is away from the rest of the house. Behind the wall is where all the heat is!

The solution was to remove the wall and install a beam to let the heat warm the rest of the house.

Not only did we accomplish the main goal - but the wall removal created a sense of space and continuity for their home.

Since, Ramelli Building & Remodeling strives to provide only the services needed the homeowners will paint and take care of the final details.  But, we do provide painting services in case you were wondering.

For more information please visit Ramelli Building & Remodeling or call 203 741 0005.

Wednesday, November 24, 2010

Roof Replacement - Cheek Wall

Under a previous post I described how we were able to replace a portion of the roof that covered the rear porch that we are converting to a dining room.


Photo 1

One of the main reasons for the urgency in replacing this portion of the roof was recent ice dams and subsequent water damage to the porch's framing.  One of valleys on the porch dumps rain water into the house wall.  There was an attempted repair to this area in the way of roofing cement. (Photo 1)


As part of the roof replacement we included stripping the house cheek wall so we could properly flash the area.


Photo 2


Photo 2 shows the roof and house wall stripped and the damage to the sheathing.  We replaced the piece of sheathing (Photo 3) and then ran ice and water on the sheathing and up the wall (Photo's 4 and 5).  As part of installing the roof shingles against the wall is step flashing as well.

Most companies would not go the extra yard of removing the siding to properly flash the house wall.  This little bit of extra work goes a long way towards giving the homeowners the best job we could provide.


Photo 3


Photo 4


Photo 5

And finally a couple of completed roof pictures with the siding re installed (we replaced the corner post so everything would match).


Please visit Ramelli Building & Remodeling, LLC for more information.  You can also email Ray or call 203 741 0005.

Sunday, November 21, 2010

Roof Replacement

During a rear porch conversion, it became apparent that finishing a room under a roof that has had water issues was not a great idea.  The homeowners had plans of replacing the whole roof next year.  We offered to just replace the roof slopes connected to the rear porch so that we could all be assured that their new room would face ice damming and leak issues.

Hopefully, the homeowners will hire us back next year to complete the roof.  But, in any case we feel good about our decision to save the homeowners some money this year (by only replacing some of the roof) and make sure that the new room has a new roof overhead.

Our roofing system uses ice and water shield on the eaves, rakes and valleys.  Ice and water has a sticky backing that adheres to the roof sheathing and seals around the nails that secure the shingles.  Its main job is to protect against ice dams and wind driven rain.

We also include a synthetic underlayment as opposed to tar paper.  The synthetic underlayment weighs less (good for your roof) and helps keep the roof and thus attic cooler - this prolongs the shingle life.  It is also resistant to any mold or mildew growth as well as protects against moisture making it to the roof sheathing.

The ice and water should overlap the drip edge (the bottom metal strip), but be installed under the rake edge (the metal going up the sides).  The rake edge metal then gets installed over the ice and water and synthetic underlayment.  This way any wind driven rain that gets under the shingles from the side will channel down the underlayment (not in contact with the roof sheathing) and drain out the bottom over the drip edge into the gutter.


See the photos to the right.  The top photo shows the ice and water installed on the eaves (bottom of roof) and up the valley.  At the very bottom you can see the white drip edge that the ice and water overlaps.  The bottom photo shows the synthetic underlayment under the rake edge metal (the white showing at the edge of the roof) and overlapped per the manufacturers instructions to shed water all the way down the roof.
Coming up next will be photos of the roof replacement from start to finish

Paint Prep

I thought I would show a few shots of the containment we normally do on paint jobs when we are dealing with a textured (popcorn) ceiling.  In this case, part of the ceiling texture was cracking and peeling. 

The first task was to do a test on the ceiling to see if we could scrape and patch the area in question or if we should scrape the whole ceiling and re paint a flat finish.  It was determined that the ceiling was repainted using a latex paint and would not accept a patch without having more cracking and peeling in the future.  Since, a textured ceiling with a latex paint will normally scrape off without too much fuss - we decided to scrape the whole ceiling and re paint a flat, non textured finish.

Before we get into the actual scraping - we first try and indentify and document pre existing conditions.  Things like previous paint splatters or smudges.  This can eliminate miscommunication after the job is complete.


And before we get into the work - it is important to seal and contain the work area so that dust does not get all over the house.


Now, we can start the messy job of scraping and skim coating the ceiling so we can paint.


To be continued...

Tuesday, October 26, 2010

Second Floor Remodel

This project emcompassed manipulating content, tearing up old carpet and particle board sub floor, installing new pre finished hand scraped maple flooring and painting.  We also added ceiling light fixtures, repaired the textured ceiling, reset the rooms and dusted everything as final touch!

This took place while the homeowners were on vacation.  We emailed photos to keep them up to date with the progress.  Below is Sue's response to seeing photos of completed work:


Thanks for sending the pictures ....    It looks just amazing . . .  I can't wait to see it in person!  It will make coming home from vacation a lot easier. . .  :-)  
I can't thank you enough for all the work you've done while we are away!
And when they came home and saw it in person:

Hi Ray -

We are home and the floors look amazing and with the painting everything looks fresh and new.  Thanks so much . . . everything looks great . . . I love it!